


Hi, I'm changing the name of my blog so therefore I'm changing the address . . . You can follow me here . . . TheQueenofBling
Thanks!
Friday, July 8, 2011
Wednesday, December 8, 2010
Handmade Bird Ornament
The other day while shopping I came upon some cool looking handmade bird ornaments selling for $10 and I thought, I could make that so I did . . . . and it came out like this . . .
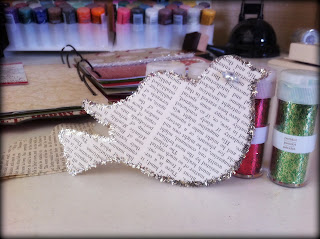
Which came out OK but I wanted to bump it up a notch so I did some browsing on the internet for some inspiration and came across this . . .blog. She made some cool looking bird ornaments too so I took some of what she did and added it to my creation and voila This is what I came up with. . .
I'm going to share with you all how I created these . . .
First step get some old book paper, you could also use cardstock, music sheets, just whatever you have. Next cut out your bird three times. If your using book paper which is thin you could layer three pieces and cut it out at the same time. At the Under the Table and Dreaming Blog She gives you a jpeg that you can print out and use as a template. I used just a chipboard of a bird I had in my stash. I don't know where it came from. But I traced it and scanned it all if you want you can print it out and use it as your template.My Bird Template If you print out my template you have to scale it to 150% If you don't know how to do this just email me and I'll talk you through it. After you get your three birds cut out mount one of them to some chipboard and cut it out to make it sturdy.

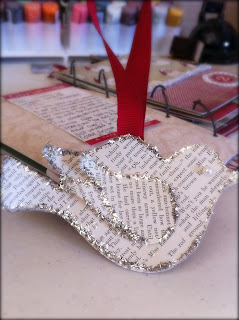
For the wings I just drew them by freehand and cut them out. You need two of these.

Next your gonna want to glue your other two birds on top of your chipboard bird, but you only want to secure it in the middle because your going to be curling the ends. I attached mine with the Helmer zap dots , there like foam mounting squares but better because they are clear! I used a total of 8 of these 2 on top of each other on one side 2 on the other then layered another bird and 2 on one side and 2 on the other side.
Then I used just two clear squares to layer the birds wings going in different directions.I didn't want the wings as high so I just used one clear square for each wing.

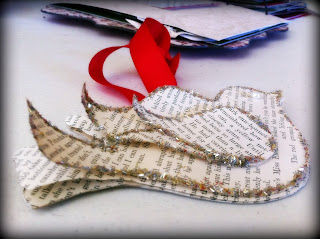
Next I used a pencil and curled the wings, I curled one layer up and one down. Then I applied a thin layer of glue all along the edges and applied some Martha Stewart tinsel glitter in white gold all along the edges. This tensile glitter was sold in special sampler holiday packs. It comes in several colors.

Then I punched a hole in the first layer of the bird, the one glued to the chipboard behind all the other layers so I could insert a ribbon for hanging.I think these would be great to hang off a present when giving a gift too. I think it would be fairly easy to make a bunch of these at one time. If anyone decides to make one please share and I'll post your picture on here! Oh, I almost forgot, I used a little pearl for the birds eye!


Which came out OK but I wanted to bump it up a notch so I did some browsing on the internet for some inspiration and came across this . . .blog. She made some cool looking bird ornaments too so I took some of what she did and added it to my creation and voila This is what I came up with. . .


I'm going to share with you all how I created these . . .
First step get some old book paper, you could also use cardstock, music sheets, just whatever you have. Next cut out your bird three times. If your using book paper which is thin you could layer three pieces and cut it out at the same time. At the Under the Table and Dreaming Blog She gives you a jpeg that you can print out and use as a template. I used just a chipboard of a bird I had in my stash. I don't know where it came from. But I traced it and scanned it all if you want you can print it out and use it as your template.My Bird Template If you print out my template you have to scale it to 150% If you don't know how to do this just email me and I'll talk you through it. After you get your three birds cut out mount one of them to some chipboard and cut it out to make it sturdy.

For the wings I just drew them by freehand and cut them out. You need two of these.

Next your gonna want to glue your other two birds on top of your chipboard bird, but you only want to secure it in the middle because your going to be curling the ends. I attached mine with the Helmer zap dots , there like foam mounting squares but better because they are clear! I used a total of 8 of these 2 on top of each other on one side 2 on the other then layered another bird and 2 on one side and 2 on the other side.
Then I used just two clear squares to layer the birds wings going in different directions.I didn't want the wings as high so I just used one clear square for each wing.

Next I used a pencil and curled the wings, I curled one layer up and one down. Then I applied a thin layer of glue all along the edges and applied some Martha Stewart tinsel glitter in white gold all along the edges. This tensile glitter was sold in special sampler holiday packs. It comes in several colors.

Then I punched a hole in the first layer of the bird, the one glued to the chipboard behind all the other layers so I could insert a ribbon for hanging.I think these would be great to hang off a present when giving a gift too. I think it would be fairly easy to make a bunch of these at one time. If anyone decides to make one please share and I'll post your picture on here! Oh, I almost forgot, I used a little pearl for the birds eye!

Monday, March 15, 2010
Talenti Gelato

I have found my new favorite indulgence . . . Talenti Gelato , Oh my goodness this stuff is to die for! I found it at my local Publix I bought the Belgian Milk Chocolate and the Caribbean Coconut, both flavors were heavenly! What makes it even better is its made with all natural ingredients. And don't even get me started on the packaging, it comes in these cute little plastic containers with a screw lid, I can't wait to recycle these somehow in a craft project. Talenti also makes a Sorbetto that I can't wait to try too! The Gelato reminds me of when Jerry and I were in Venice, Italy. Every night after dinner we walked to a little Gelato stand and we would indulge! The picture below is one I took of our sweet spot!


If you can't find this locally you can order online from there website .
You can become a Facebook Fan here.
Friday, March 12, 2010
This American Life
Here's a little iphone app review for "This American Life". This American Life was originally a public radio show broadcast produced by Chicago public radio, and it still is. But they also came out with a TV version that aired on Showtime that won lots of Emmys and now they have there own Iphone app. What This America life does is tell stories, they have a different theme each week and they go around the country and have different people tell there stories in relation to the chosen theme. The app cost 2.99 and I find it very entertaining. I love to play it in the background as I drive or even around the house. I could tell you all about the app and the features but I don't have to because here's a short video telling you about the Iphone App .
You can also watch the shows that appeared on Showtime through the Itunes store or I sometimes will watch them on Netflix.
You can also watch the shows that appeared on Showtime through the Itunes store or I sometimes will watch them on Netflix.
Thursday, March 11, 2010
I'll pray for you!
Every-time someone hears me play this song they love it and always ask who sings it . . So thought I would share this video of the guy who wrote it singing it, such a cute song and the guy's not bad looking either! :-)
At least play the video till he gets to the chorus, because that's when it gets funny!
At least play the video till he gets to the chorus, because that's when it gets funny!
Tuesday, March 2, 2010
The Bachelor
If you know me you know I'm a total reality TV junkie, but hey at least I admit it right? I didn't get to watch The Bachelor in real time I had to watch it today. But I was very careful, not to go on Facebook, Twitter, or watch any entertainment news because I didn't want to spoil the ending.
But my opinion seems very different then most of my friends on this subject, although I don't necessarily like Vienna I'm not the one dating her or marrying her. I actually really like Gia. But I know exactly what Jake was talking about when he was talking about how something with Tenely felt forced.
I've dated enough people in my life to know the difference when you have that spark,that chemistry that x-factor with someone. I've dated people who had everything going for them, good looks, personality and etc, but it was missing something and sure I could of made it work with one of them but I think deep down your soul longs for that passion and chemistry. Its not something you can pinpoint or describe. When I met Jerry we had that undeniable chemistry, it was off the charts. I mean I had felt chemistry before with people but not like that. We met at my sister's wedding we danced at the wedding and went out afterwards and it was just understood that we were together from that moment on. We married four months later! When you know you know.

But let me say I think it take more then chemistry to keep two people together, there's a lot that factors into that and who know's if Jake and Vienna will be able to stick it through. In a marriage you have to re-spark that chemistry you first felt for each other. The Bachelor show doesn't have a very good success rate, but I do believe that Jake was right to go with those feelings he had with Vienna, because he would of never had that with Tenely and he would of always been searching for it.
In my Opinion anyone's who has felt that undeniable attraction and chemistry for someone has to understand why Jake would choose that over the safe sure bet of Tenely.
Thursday, February 25, 2010
Pen Tablet Class

For Christmas Jerry got me a Bamboo Craft Pen Tablet . So I signed up for Jessica Sprague's online class "Pen Tablet Basic's for Scrapbookers". I'm only on lesson three but I'm loving it! And if your reading my blog your looking at my handy work, I drew the martini in my banner!Ok, I'll admit it, I'm patting myself on the back . . . but It only took minutes to create my blog header. I'm thinking the more I practice the better I will get at the pen thing! If you ever get a chance to take a class from Jessica Sprague, do it! I love her teaching style and the great thing about her online classes verses some other's are that you have access to your classes forever!
Imikimi
Weird name, but awesome app! I can't even tell you how many photo editing apps I have on my iphone, but I can tell you this . . . I have the most fun with Imikimi! Its a .99 app and worth every penny! I love all the different ways you can share your creations . . . email, mms, facebook, and twitter! Go here and check out there Video telling you all about it! Make sure you click the "Full Imikimi" video icon right above the player and watch that one too! Here's on I made for my sweetie who's out of town, I texted it to him.
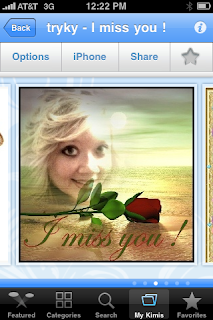
This is a screen shot from my phone
Oh, and don't be sad even if you don't have an Iphone you can install the Imikimi plug-in on your computer and upload your photo's edit and share them!

This is a screen shot from my phone
Oh, and don't be sad even if you don't have an Iphone you can install the Imikimi plug-in on your computer and upload your photo's edit and share them!
Wednesday, February 10, 2010
Valentine Glitter Cups
So for Valentines I made more glitter cups. I bought the small foam cups from the grocery store and made those for the kids classmates. Then I did the big ones for the Teachers. If you want to know how to do these just check out my tutorial that I did for Halloween Glitter Cups!

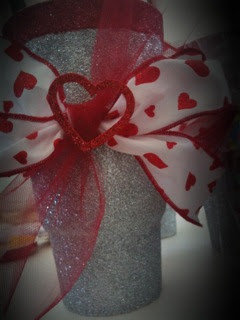
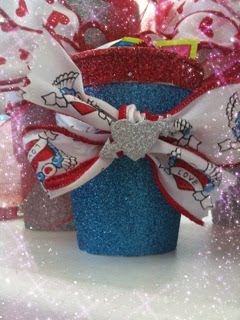
And for the little glitter cups I put those in cellophane bags so it would be easier for the kids to carry to school.
I also made some valentine mussy tussy's . . . .

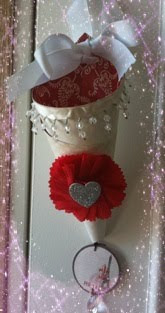
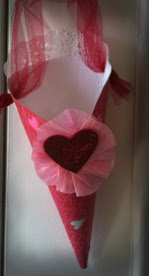
Now there are several different ways to make mussy tussy's but I found this tutorial to be the best or should I say easiest!


And for the little glitter cups I put those in cellophane bags so it would be easier for the kids to carry to school.
I also made some valentine mussy tussy's . . . .


Now there are several different ways to make mussy tussy's but I found this tutorial to be the best or should I say easiest!
Saturday, February 6, 2010
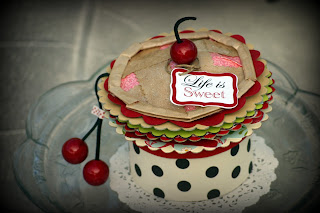
Cherry Pie Album
Here's a class discription and some pictures for those of you are interested in taking my Life is Sweet, Cherry Pie Album Class. I'll be teaching it at the Hilltop Memories Annual Winter Retreat.
Life is Sweet, Cherry Pie Album
In this class we will be making a pie, but don't worry no baking skills required, our pie will be made out of paper!
When you lift up the top of the pie you will have 5 scrapbook album pages. The box underneath that the pie sits
on can be used to hold anything you want! This album is so cute just sitting on your counter for decoration.
In class I will teach you how to make the top of the album, your crust and filling then I will be giving you a pictured
instruction sheet and all the supplies you need to finish the inside of the album (the five pages) on your own,
outside of class. The hardest part of course is the outside. The inside is easy as pie! :-) Punt intended!
Supply List:
Paper Trimmer
Favorite Adhesive
Tim Holtz mini stapler
Distress Inks: Antique Linen and Brushed Corduroy
Distress Ink Applicator
Optional:
Glossy Accents
*Note: if you don't have something on this list, don't worry you can use what I have!


Subscribe to:
Posts (Atom)


